Blog

  • Guide to a well-dressed Dog: Vizsla Jackets and Sweaters

    Guide to a well-dressed Dog: Vizsla Jackets and Sweaters

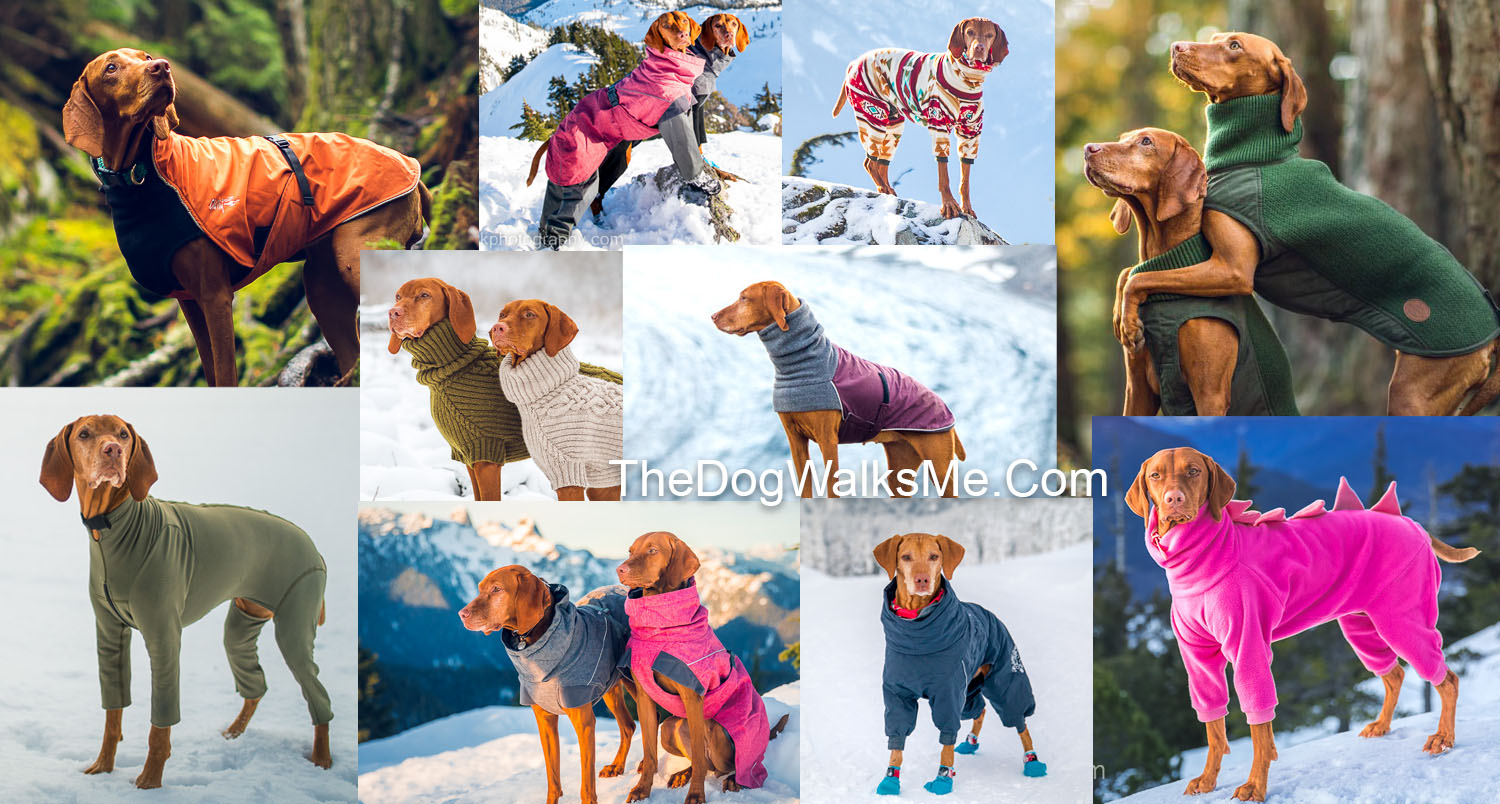
    Are you confused with the amount of options of canine jackets and sweaters available on the market? Or maybe you’ve tried several and find nothing fits your skinny long dog properly? There is such a variety of dog breeds from short and stout to long and lean and unless your dog magically fits the “standard” size it can be hard to find something that fits and stays on an athletic crazy running machine. We’ve tried so many different options and this is what I’ve learned.

    Velcro vs Buckles vs Zippers

    This is a big point of difference in choosing a jacket. Ideally you find a jacket with the least amount of connection/adjustment points. This can be counterintuitive as the more adjustment points, the easier it is to get a good fit right? Perhaps, they’re more adjustable, however these jackets will rub more, and will also come off easier with an active playing dog. Jackets with 3-5 Velcro panels are the bane of my existence. They look awful and these panels will come off easily over time.

    Velcro is great for easy of use and quickness, for fitting different dogs without adjustment, and for not rubbing or chaffing on the pup. The downside to Velcro is that it can come off with thick brush, with deep snow collecting, and with rough play. Velcro also degrades with use, especially the cheaper Velcro (there’s a huge difference in quality) so make sure that Velcro jackets are high quality if you want them to last.

    Buckles solve alot of Velcro issues such as inadvertently coming off after rubbing past bush, or a dog pulling the panel with play. Buckles snap easily and can adjust with straps. Sometimes buckles are used in conjunction with Velcro for the best of both worlds. The problem with Buckles is that they don’t have a clean profile, they can rub or get in the way with harnesses, and they’re a small point of connection so jackets have to be structured well in order for them not to unravel or lose shape.

    Zippers are a very clean look and connect a large panel of fabric together. They’re wonderful not coming apart or wearing out, however they are not adjustable so the fit has to be somewhat perfect for only a zipper to be used in a jacket

    Finally, there are jackets and sweaters that do not have any attachment points and depend on the jacket fitting perfectly to the dog to not fall off. I love these the best, but they are the hardest to find and fit as your dog grows and changes!

    Fit for skinny dogs- length vs chest

    Fitting jackets on different shaped dogs are difficult. I find most of the mass produced clothing fit a stout, somewhat rounder and and shorter dog than mine. I’ve had to find specialty dog clothing to fit my Vizslas, or just accept that the length will be shorter and the stomach panel barely covering. These jackets usually twist on the dogs as they run, or leave their backs and stomach open to the elements.

    Here’s a list of dog companies that make long/skinny/lean dog jackets, many of these are custom

    Voyagers K9 Apparel

    Our most used rain jackets and winter jackets come from this brand. They are breed-specific fits and are easy-on easy off with Velcro. There are two Velcro straps which really help keep the jacket on crazy dogs and it’s great quality (I have much experience with sewing and Velcro). The fleece is also very high quality and extra thick. No matter the amount of washing these jackets have gone through, they haven’t seemed to degrade.

    Voyagers is run by an American family with the mother sewing all the jackets and they can be custom to your own dog for an extra fee. There can be added harness holes and custom shapes for an oddly shaped dog. Although puppy teeth and barbed wire will tear the fabric, it holds up much better than other cheaper jackets. *wash these jackets with tech wash

    K9 Voyagers winter jacket

    Chillydogs.ca

    These jackets (the standard option) fit Vizslas perfectly. They also have long and lean (greyhounds) and another cut for short and broad dogs (Bullies). The jackets use both buckles and Velcro, and are quick to put on, never coming off because of the buckle. The winter option covers the front of the chest and has a fleece-lined shell for added wearability. The neck is a bit shorter and less thick fleece than Voyagers but there is the chest panel and buckle. I find the Alpine Blazer to be a great all-round jacket for those days that aren’t too cold, or too wet but just chilly enough to need a jacket.

    Chillydogs Great White North Winter Dog Coat
    Chillydogs Alpine Blazer

    Hurtta

    Hurtta is a company from Finland that have recently expanded to North America. They have some really interesting products that I haven’t seen elsewhere. I especially love the Eco line that uses 100% recycled polyester fabric. Not all Hurtta jackets fit skinny/lean/hairless dogs well but the ones that do are keepers!

    Hurtta’s Expedition Parka was made especially for lean dogs without undercoats like Vizslas. The fabric hugs the dogs (vs a shell that leaves so much air between jacket and muscles) and includes adjustment points as well as a snow trap on the neck that really keeps heat in. There’s a fully chest panel, and the jacket is coated with water wicking properties (not fully waterproof but fine with snow). The jackets use only one buckle but stay in place really nicely.

    Another jacket I love and use is the Extreme Overall. This one is the warmest one-piece clothing I have for the dogs. It’s good for about -15 (once it gets to -20 for 5 hours we switch to layers). The overalls take a bit of time to put the dogs in, but there’s many adjustment points and they fit the dogs well.

    Vizsla Tea

    This is the only brand I haven’t tried but I would recommend if you’re in Europe. I’ve heard good things and they’re made specifically for the Vizsla breed.

    K9topcoat

    I’ve more recently been using K9Top Coat in the winters. Because of our wet and cold climate, we’ve been using the Weatherproof Bodysuit that has the most water-repellency. I haven’t tried the other suits they make, but there are lots of options for dogs that have allergies, injuries, etc. The weatherproof suits have fitted my Vizslas very well (cut the legs off higher or they will snowball). They’re perfect for layering underneath jackets and for camping.

    Bravehound/Redbarkshop

    If style is what you’re looking for, look no further than Bravehound. These are custom made with Vizslas in mind. I sell them in my shop with the measurements taken from 100s of Vizslas in 5 sizes. The sweaters are hand-knit and stretch perfectly as the dog breathes and runs.

    I’ve never been able to find a sweater that actually fit the length of a Vizsla and stretched nicely over their chests so I started bringing these in for sale. There’s a hole for a collar, and my oldest sweater is still lasting nicely, although these aren’t for rough play or running through the bush (They’ve survived all that, but I try not to!). Also machine washable (all the jackets on this list are!), and finally 100% wool.

    There’s also a more fitted vest for sports in the winter and keep the dogs warm. The Bravehound wool gilet is zippered and allows for easy sprinting while keeping the dogs warm (perfect for Cross Country Skiing).

    Bravehound Technical Gilet Vest

    Threadzntails

    You cannot find better fitting onesies (and other shapes) as these are made custom to your dog’s size. They even have matching human hoodies if that’s your thing! Everything is custom to exactly what you want, including collar style, legs, stomach paneling (girls and boys), and fabric type and color or design. For the customization I think the pricing is extremely fair. Since there are no zippers or Velcro, these are very easy to wear, but take a bit of time to slip on. I have friends that are addicted to getting these as they’re so fun to design yourself.

    Puppies

    I think I found this jacket for $8 in the clearance bin and it was just fine for puppy Whiskey

    For puppies I always suggest getting something second-hand to last for the first half-year. The jackets I recommend are not cheap, and unless you want to splurge (or have an ongoing amount of puppies in your household) it may not be money well spent. Puppies also have shark-teeth and are pretty unforgiving in their playing and tumbling so it can be best to wait until after they stop shredding everything in sight. Whiskey had a cheap $8 jacket that was torn and handed down to someone else after she outgrew it.

    Price and Longevity

    As with most things, you tend to get what you pay for. I’ve tried the cheaper mass-produced clothing out there and as well as being poorly fitted, they do not last very long. Whiskey isn’t a hard playing dog, but we’ve ripped several jackets and worn out the Velcro in others. Other times the jackets with tiny stomach panels (many just have a strap) cause the jacket to fall to one side and just get trampled or torn. I love jackets that last, fit perfectly, and look great!

    Rain and Waterproofness

    Voyagers k9 has the most waterproof jacket in the market

    I find most jackets that are “waterproof” or “weatherpoof” will not actually keep a dog dry for 3 hours in a downpour, or wet snowfall. Now, I’m assuming most people do not take their dogs in drenching conditions hiking, but it’s a really good way to test waterproofness in dog jackets. The most waterproof Dog Jacket we’ve found is the Voyagers K9 Apparel. They’re the only ones that have stood up to pouring conditions and are still fully waterproof years later.

    Since I take out multiple dogs at a time, I will use all the jackets I have, and Voyagers consistently keeps the dog dry compared to others. However, nothing will keep Bourbon warm and dry when she jumps in and swims after ducks in the winter… I also highly suggest keeping your jackets (no matter the brand) clean and using a proper “tech” wash to clean the jackets and keep them as waterproof as possible

    Snow and ice

    Whiskey “swimming” in powder

    You make think any jacket that is warm should be fine in the snow, however I’ve found some are much better than others. If snow is going to touch the jacket, it can collect inside (especially those with dogs that like to swim in snow) and it can also cling to certain fabrics, and with body warmth, melt, then turn into ice. There are certain pieces that can freeze up and ice over rubbing the dogs as they run.

    Anything with a stomach panel, especially one that covers the front of the stomach will collect snow with a swimming dog. An example is the Hurtta Expedition Parka. As much as I love this jacket, if Bourbon runs through deep snow, the snow will collect and stay in the chest, and then melt and hold iceballs next to her stomach. The Chillydogs winter jacket is similar in this way. This isn’t a problem for running around in packed snow, leashed walks, and dogs that don’t enjoy swimming.

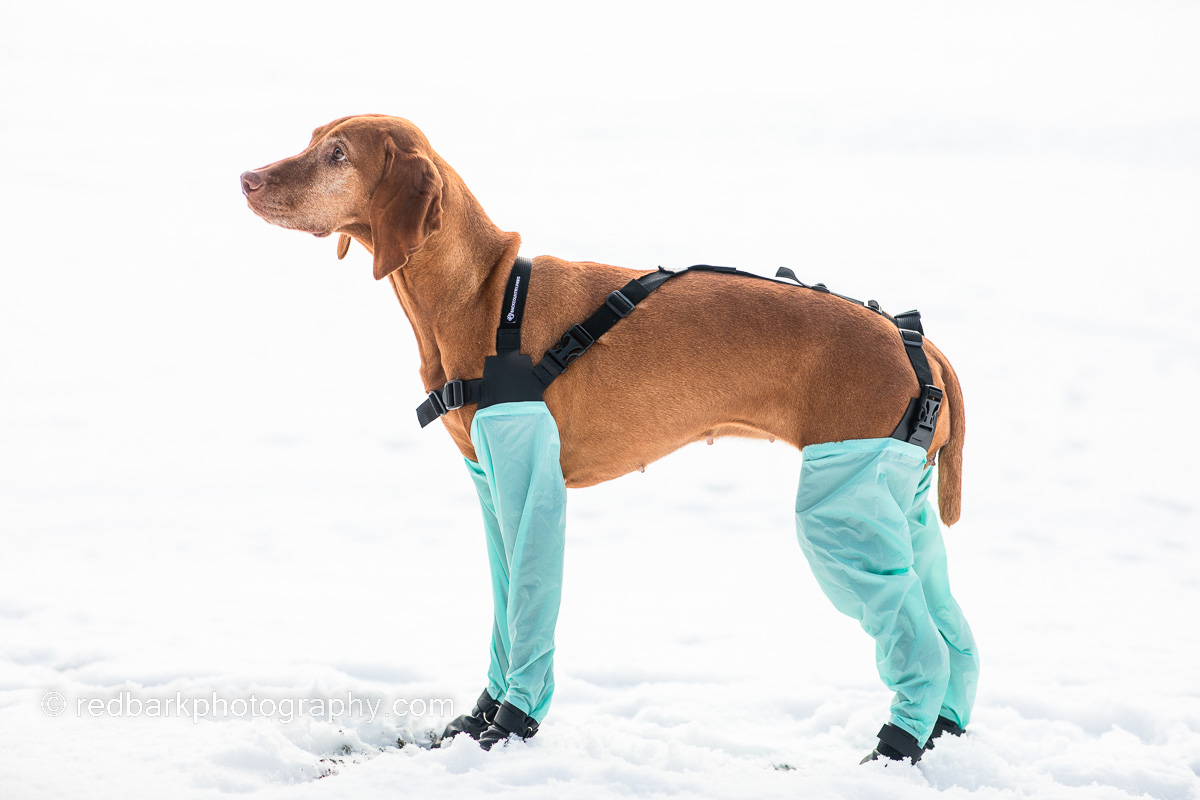
    I’ve also noticed the Hurtta Overalls legs get icy, as well as the k9topcoat weatherproof bottom legs get iced up. The best option I’ve found for cold legs that need coverage is using the backcountry gaiters.

    Citywear and Loungewear

    It can look ridiculous but these dogs do get cold and sweaters or onesies are really amazing! They’re wonderful underlayers, and great if you keep your dogs in a cold car for competitions or roadtrips, for car camping in the winter, cold cabin days, or just an on-leash walk in the city. Perhaps you have a calmer senior dog that chills quickly with arthritis, have a dog recovering from injury, or a dog that refuses to potty when it’s cold outside? A warm sweater or jacket can be wonderful!

    Lifejackets for Dogs

    There are not too many companies that make dog lifejackets, but here’s a couple to check out.

    Ruffwear – Our favorite that we’re currently using, easy adjustments, hidden straps. The biggest selling point is the front strap, where most jackets are thin and can come out of place, Ruffwear has a thicker front band and the strap doesn’t chafe

    Hurtta – I have not tried but I trust this company

    Outward Hound – A lower price point, I just don’t love the strap system, but works great

    Kurgo – I haven’t tried this one, but Kurgo is a well trusted brand

    Dog Life Jackets are really area dependent (where you can buy them) but I would advise for less straps flapping around and more coverage, You want to be able to lift your dog in any position from the handle and not have your dog fall out or chafe. It’s also really helpful to have a leash attachment point. Since your dog’s life may depend on the life jacket working, I wouldn’t get something cheap off Amazon.

    I’m not sure this brand as I borrowed this lifejacket but it kept Bourbon safe!

    Hunting/protective

    I don’t have much information on protective wear for hunting but guess who does… Accidental BirdDog! Her blog posts have loads of information on hunting and this one covers some protective clothing for hunting dogs.

    Layering- protective and cold

    Whiskey has k9topcoat tights underneath and Bourbon has Backcountry Gaiters as well as Expedition Parka

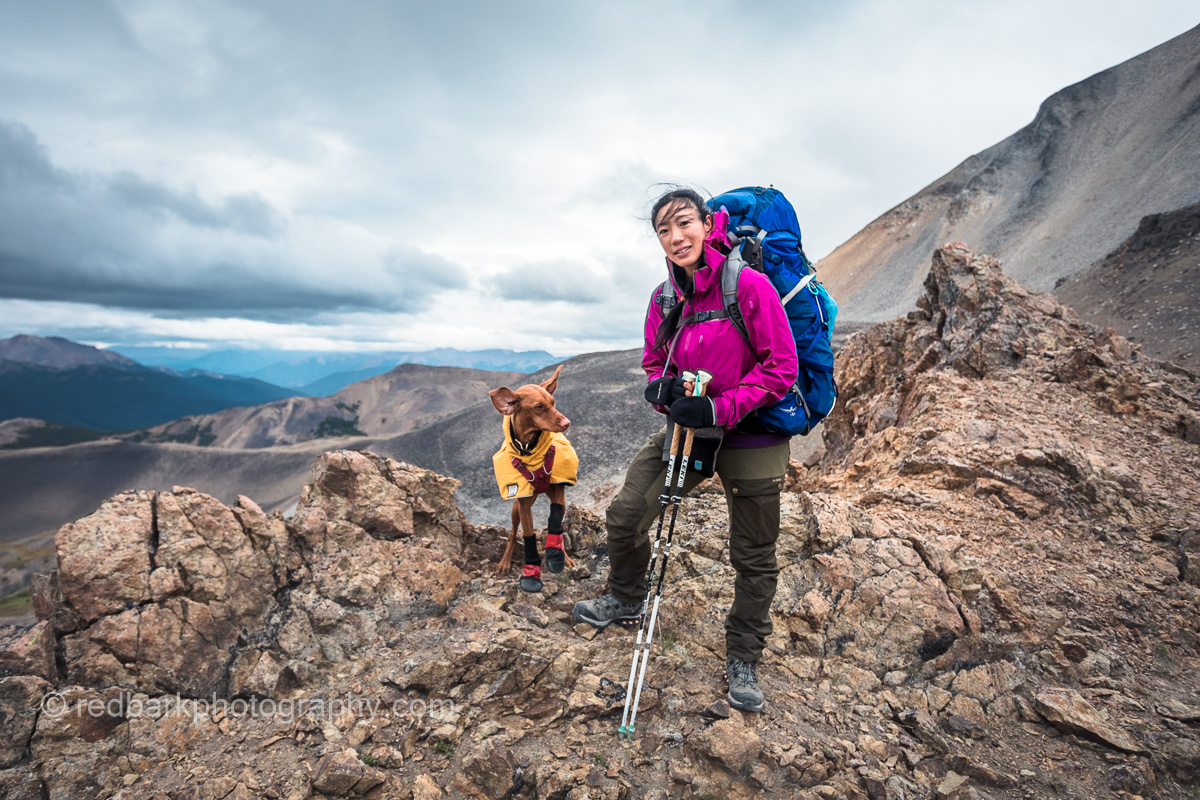
    We are masters at layering! Hiking in the mountains, and backcountry camping involves adjusting and changing to the weather. I normally carry a couple pieces of clothing for the dogs when we are backcountry camping and layer as needed. Sometimes in the winter, we will start on a warm day and the clouds and snow and wind will come in on the peak and I’ll have to redress the girls right on the trail in order for them to survive.

    Do not be shy from layering, even if it looks ridiculous. I typically like a onesie/tights underneath a warm jacket, and some sort of boots if needed. Dog Googles are great if the wind really picks up and starts shooting snow at your face. If you can barely open your eyes in the wind, your dog will appreciate googles (but these do take training to wear).

  • Ultimate List of Dog-Friendly Hikes in Squamish/Sea to Sky

    Ultimate List of Dog-Friendly Hikes in Squamish/Sea to Sky

    warnings:

    Most of Squamish is officially dogs-on-leash however you’ll find most people skirt these rules outside of the downtown areas. Squamish, including downtown has loads of wildlife you must be aware and prepared for. DO NOT let your dogs off leash if you cannot recall them from wildlife. You will find Black Bears, Coyotes, Eagles everywhere throughout Squamish including residential areas. There are also Cougar sightings almost constantly in one trail or another, and less common are wolves, Grizzly bears, bobcat, and elk. Check trail reports before you go to avoid cougar and bear sightings.

    Here’s a list of beaches and lakes to take your dog paddling along the Sea to Sky from Vancouver to Pemberton and beyond!

    Wonderland Trail is super green in the winter

    Parking is very limited in the summer in certain places, especially weekends. Avoid busy areas with dogs as a curtesy of other trail users. Trails may close due to Grizzlies and Black bear issues so check before leaving. Roads can close due to flooding/washouts. Roads and parking are also different in the winter as many FSRs are snowed in and never ploughed. Chains are usually necessary in the winters. Check avalanche forecasts and have knowledge before you head out. Many areas have no reception so download or print maps, and have a point of contact if your car breaks down.

    Alexander Falls Frozen in the Winter

    Easy- 1 hourish

    Ray Peters
    Very flat, official dog-off leash area, can be close to the highway so be aware, bears, coyotes, lots of options to make your own, also good for biking

    Alexander Falls
    Winter hike, entrance fee to Callaghan, microspikes advised

    Whistler Trainwreck
    Several entry points, watch for trains and broken bottles, metal on the ground

    Wonderland
    Close to highway, so be aware! Great for running on-leash or biking

    Cat Lake
    Extremely busy in summer, AWD, not ploughed in winter

    Starvation Lake/ Cheakamus Canyon
    AWD advised to park in the canyon, must leash up to start by highway

    Crumpit Woods is close to town but beautiful views

    Moderate- under 3 hours, uneven ground

    Crumpit Woods
    Easy to get lost, bears and cougars sometimes present, lots of trail options

    Murrin Lake/Jurassic Ridge
    Must leash around lake, no dogs around lake, busy in the summer, easy to get lost

    Murrin Lake views overlooking the Howe Sound

    4 Lakes Loop
    Very busy in the summer, No dogs at Alice lake (walk on road do not follow the map), lots of offshoot bike trails to add-on, limited parking

    Smoke Bluffs
    Easy to get lost on the trails, Lots of viewpoints

    Brohm Lake
    Very busy in the summer, lots of trail options, awesome views from viewpoint, places to dip in the lake, leash near highway, very limited parking

    Crooked Falls
    Road can flood, AWD, Leash around waterfall, No reception

    Tunnel Bluffs

    Moderate/Hard- under 4 hours, uneven ground, steep sections, trailfinding

    Watersprite
    Very busy in the summer, Bears almost constant in the summer, cougar area, no reception, winter route is different, cars will need chains in the winter

    Debeck’s Hill
    Short but steep and easy to be lost, several options, views aren’t great

    Chief
    Very busy in the summer, may need daypass, leash around steep areas, 3 peaks for options

    Sea to Sky Gondola/Sea to Summit Trail
    Buy dog ticket at the bottom to go down by gondola, steep sections, rope areas, microspikes on icy days needed

    High Falls
    Easy to get lost, Grizzly and black bears, AWD, no reception, leash near falls

    Tunnel Bluffs
    Very busy in summer, log crossings, Black Bears, paid parking, limited parking

    Triconi is a real scramble

    Experienced only

    Brandywine
    Black bears, busy in summer, closed during snowmobile season, awd to lower parking, 4wd to higher parking, No reception, no trail past meadows

    Triconi Peak
    Scrambling and boulder fields, 4wd with clearance, wasps, black and grizzly bears,

    Lake Lovely Water
    Fast water crossing (need boat), wasps, bears, busy in the summer, no reception, no water, no dogs allowed in hut

    Seed peak
    AWD, routefinding, steep sections with rope, no reception

    Brandywine is beautiful, but it’s true wilderness

    Last warnings!

    Be aware of human feces that might be laced with drugs on trails. This is a common problem especially around where people camp, on bike trails, and busy trails. If you notice excessive panting, dilated eyes, excessive drooling, disorientation, turn back immediately and seek help. Another common issue are dogs chasing (or being chased) by bears. In both cases you should be in control of your dogs as there is very little help out of reception. Wasps can sting out of seemingly nowhere (when you pass through a ground nest) and dogs may bolt or be allergic so it’s good to have anti allergy drugs. Lastly, water loving dogs need to be leashed near fast moving water especially Lake Lovely Water, Crooked Falls, High Falls, and Sea to Sky Gondola hike. Dogs have died on these rivers that turn into waterfalls.

    Crooked Falls, slippery and a deadly fall

    Not Dog Friendly

    These places dogs are absolutely not allowed!

    Garibaldi Park (Garibaldi Lake, Wedgemount Lake, Elfin Lakes, Black Tusk), both sides of Whistler due to watershed/park rules (Blackcomb, Whistler peak, Rainbow Lake, Cheakamus Lake, Iceberg Lake, Mount Sproatt) as well as Joffre Lakes and Tenquille Lakes further north.


    Check out more on a list of beaches and lakes to take your dog paddling! And here’s a post on how to each your dog to recall off leash as well as a recall challenge to try before heading out into bear country! Support my page by checking out my shop redbarkshop.com

  • Dog Boots Guaranteed to stay on: Backcountry Paws Gaiters review

    Dog Boots Guaranteed to stay on: Backcountry Paws Gaiters review

    One of the most interesting pieces of winter dog gear that we’ve used are the Backcountry Paws dog gaiters. Does your dog need, but lose boots all winter long? This might be for you!

    Dog gaiters might look like the weirdest dog contraption but they really are quite functional and solve a couple issues I’ve found no other answers to.

    Whiskey with her Backcountry Paws Dog Gaiters

    The problem:

    Dog booties can be necessary if your dog’s paws are too cold (say -15 degrees), or if your dog’s paws develop snowballs, or if your dog’s paws might need protection for other issues. Fast running energetic dogs lose dog booties all the time and these can be expensive! We tend to use dog booties for hikes less than 2 hours, especially if the trail is wide and easy to find missing booties.

    But what do you do if you are sick and tired of losing dog boots? For those longer hikes, or when I don’t want to spend my time finding lost booties, I use these gaiters. Because the gaiters have boots attached, this makes it impossible to lose boots and voila your issue is fixed! Read on for the caveats!

    Our experience:

    The first time I tried Backcountry Paws gaiters, I was a bit intimidated by the straps but it was fairly straightforward and logical to put on. Whiskey is a really patient dog so she helped us both get used to the gaiters and find out together how to use them. My dogs are right between the sizing. Whiskey has a large size gaiter and Bourbon a Medium. I can fit either in either size but the medium is pretty tight on Whiskey and Bourbon swims in the Large.

    The best uses of these gaiters are on packed trails or loose fresh snow no higher than the knee of the dog. They’re great for active crazy dogs that lose boots, and those that collect snowballs on their paws and lower legs. The gaiters are also good for windy days when you want the entire length of the dog’s legs to be covered. I’ve not found a long-legged bootie that my dogs actually accept and enjoy, that stays on for 4+ hours, outside of this solution.

    How to put on:

    Step 1: Separate the front and back
    Adjust and fit the front paws first

    First you need to separate the front and back of the gaiters. I noramlly start with the front legs (undo the buckles to help). Place the boots atop the dog so you know where the front and back of each leg is before you start. You want to avoid putting the boot on front to back (you cannot tell outside of the top straps) so first get your placement otherwise the boot will be twisted.

    Add the back section and then snap together

    Once the front boots are on, you can place the back boots on and then buckle the back strap to the front section. Make sure the velcro on the boots is on very well because once you hit the snow and the velcro starts icing over, it’s much harder to redo well.

    Suggestions:

    For short haired dogs, I really do suggest tights on underneath. If it’s cold enough to need gaiters, you’re most likely needing a jacket for a short-haired dog and tights will help prevent rubbing. For even colder weather I put a jacket on top of the tights and gaiters (see the photo below). This is a pretty good combo for very long cold days!

    Try putting the contraption on at home first. Gaiters are not the easiest to put on a very excitable dog at the trailhead, in a dark car, without help. With that said, my girls are very patient with all kinds of clothing so I’ve actually not had issues myself, but Whiskey and Bourbon are not the type of dogs to bark or run around a car excitedly at a trailhead.

    Make sure the velcro is done up tight

    Lastly, take the time to really look and do up the straps around the ankles well. Make sure they’re firm and tight, that the paw is entirely the way inside, and that the least amount of strap is hanging loose.

    New version:

    Version one of the gaiters

    Backcountry paws have released version 2 of their gaiters. The first flagship product was very well made. Whiskey still uses it without issues but it’s been really nice to see the improvements. There are less hotspots to rub on the dog with the new version (I normally have the dogs in k9topcoat tights underneath so it hasn’t been an issue for us). The second big improvement are the boots. The inside doesn’t have a seam to rub, and are looking much more comfortable. If your dog has issues with hotspots, get version 2!

    Downsides/Caveats

    There’s been a couple downsides I’ve found with dog gaiters. First, they take a longer time and a more patient dog to put on. You need to familiarize yourself with the system and you’ll have to adjust the straps for your dog the first time, so try to do this at home.

    Second, the gaiters can fill up in deep snow. If you’re snowshoeing and the snow is higher than the knee of the dog, the dog can kick up powered snow into the gaiters and then the snow goes inside and collects. Or if your dog goes swimming in powder, the tops of the legs are not sealed (there is no sealing on any dog jacket). There’s no way for the snow to come out so you’ll have to make sure that your dog isn’t walking around with a bag of snow. I have this issue more with the back legs because of the shape, and sometimes I might take off the back legs but leave the front ones for this reason.

    Snowshoeing in powder led to the back legs being filled up

    Third, the gaiter fit needs to be correct and I find that the paw size needs to match the leg size. For example, you buy the gaiters sized to the leg height, the bootie size may not fit perfectly (especially if your dog is shorter but has gigantic paws). So just check fit before you buy!

    Have you tried these? Do you have comments? What was your experience like?

  • How to: the Unbelievable Moraine Lake with Dogs

    How to: the Unbelievable Moraine Lake with Dogs

    Moraine Lake

    One of the most famous and busy lakes in the world, Moraine lake is iconic and was featured on our older $20 bill. I’ve taken my Vizsla Whiskey loads of times for day trips and hikes and when I got Bourbon, my new Vizsla puppy, I took her on the 11 hour drive as soon as I got her.

    10 week old Bourbon could hike up the 350m to the Rockpile for photos

    Banff National Park

    Moraine Lake with dogs? Yes! Dogs are allowed in Banff National Park! Unlike the American National Parks, dogs are allowed on most trails and in the backcountry however there are expectations including times of the year for specific areas and trails.

    We love all seasons at Moraine Lake!

    Dogs must be on leash for many reasons including your safety, their own safety, and wildlife safety. There are loads of Grizzlies, Black Bears, Moose, Elk, and Porcupine to name a few. I’ve seen all of these animals within the park and I’m not a local! It goes without saying, please pick up after your pet, and keep your dog on a tight leash, under control around other dogs and all the chipmunks that beg for treats everywhere (I’ve never seen fatter chipmunks around).

    Elk, Moose, Bear, and Porcupine can all be dangerous

    There are lots of garbage cans and toilets at the parking and the National Park is pristine so please help keep it dog friendly for all of us!

    Getting there

    Moraine Lake is located in Banff National Park right on the edge between Alberta and British Columbia (on the Alberta side). You can see mountains in British Columbia right at the lake. The road to Moraine Lake branches off the road to Lake Louise, the closest gas station and town.

    A long drive with the dogs but worth it!

    It’s about 2 hours 20 minutes from Calgary and 9 hours 30 mins from Vancouver (I’m 10 hours 30 mins away in Squamish, BC). Banff National Park and Moraine Lake is one of the most accessible locations for Canadian beauty. So many of the most famous lake are less than 400m walking distance from parking lots and the roads around the area top the most scenic of the world.

    Moraine Lake Road and Parking

    Getting to Moraine Lake with a dog is most of the battle. The easiest way to guarantee getting there without a dog, is using the shuttle or booking a tour. However, the buses don’t allow dogs so the only way to get to Moraine lake with a dog is driving or hiking. Assuming you aren’t hiking in (13km or so, one way, from Lake Louise), you’re going to want to drive in.

    Coming towards the end of the season is less busy

    Moraine Lake Road opens seasonally so first see if the roads are open for the year. You can ski or bike up the road off-season but it may be too long to go with your dog back and forth.

    Dogs must be on leash

    When it is open, Moraine Lake parking lot tends to fill up in the mornings around 530am on weekdays and 5am on weekends although people do leave and the attendants will slowly let people in throughout the day. The parking lot is very small for the demand so if you’re set on making it, get there early! During high season such a Canadian long weekends or larch season, the parking can fill before 430 am! Please also note that you must enter Moraine Lake Rd from Lake Louise (no left turn from Lake Louise Drive).

    We usually only stay an hour for photos if we are not hiking here

    Normally you cannot “line up” with your car on the road to get in, so it’s luck while you drive by the road entrance if they’re allowing cars in or not. Somehow we’ve always had luck getting in with some persistence. If the road is closed, you can loop back through the village and through Lake Louise Lake but the loop can take up to 30mins and the road may still be closed so be prepared or just come early. You cannot sleep overnight in the parking lot, and you do need a Parks Pass in order to park. I’ve also had luck coming at the end of the day around sunset after the hikers and families have left.

    Bourbon and Thierry at the beach

    Photo Ops at Moraine Lake Rockpile Trail

    Most of the photos you’ll see of Moraine Lake are all taken from the Rockpile Trail. It’s about 300m from parking and one of the best views you’ll see with so little effort. Even so, the trail is not wheelchair friendly and has stone and log steps. There are lots of chipmunks and pikas teasing the dogs and begging for crumbs so watch your dogs on leash!

    Lots of places to take photos at the Rockpile
    Tourists lining up to take photos with Whiskey (2018)

    We took Bourbon here at 10 weeks old and she found someone’s leftover chicken wing in the bushes. The scream she let out when we took it away frightened a couple tourists! Whiskey normally has a line up of Asian tourists waiting to take photos with her here. I usually place her on the wall and we’ll get at least 10 people taking photos with her. She absolutely loves the attention while Bourbon’s trying to track chipmunks.

    Bourbon’s first adventure

    Paddling Moraine Lake with Dogs

    The Canoe Rentals at Moraine Lake are run by the Moraine Lake Lodge. The lodge and the canoes are not dog friendly so you must bring your own boat to paddle with. For reference the canoes are only rented from around mid-June to mid-September and are around $130 Cad an hour (!!).

    Finally a calm day for a paddle!

    The lake is actually quite windy I’ve found and we’ve had to come repeatedly in order to find a day to paddle with low winds. We launched some Oru Kayaks from the beach and paddled down the lake at sunrise with both girls on my lap. It was one of the best and most peaceful memories I’ve had at the Rockies. This was in October when no one else was out on the water.

    Sunrise with two pups on an Oru kayak

    There’s also been another trip in October where we bundled up and launched a packraft when I just had Whiskey. It’s more stable with winds but also a bit colder to sit in. I really suggest coming out with a paddleboard or kayak if you have the chance!

    Alpacka Rafts are amazing and pack down light

    Day hikes

    Moraine Lake is known for the Larch Season in September when the larches turn golden and crowds from all over come to see the autumn colors. Larch Valley on the way to Sentinel Pass is one of the easiest Larch hikes, around 535 m gain and 4.3 kms one way on a non-technical trail.

    Larch Valley in the autumn
    Sentinel Pass

    There are also several other hikes that I haven’t yet had time to try. I’m pretty sure my girls would be able to do the Tower of Babel scramble, as well as Panorama Ridge passing by Consolation Lakes. I’m not sure if Eiffel Peak or Mount Temple or Wastach Mountain is dog-doable but one day we might see!

    Lake Annette from Paradise Valley

    Another hike that starts on the Moraine Lake Road, but not the lake is Lake Annette and the Giant Steps. If you hike far enough into Paradise Valley, you come out the other side of Sentinel pass and end up in Moraine Lake but I think most people take that as a multi-day trip. You would need to hike down the road or catch a lift with someone if you wanted to do that road-trip but it might be worth it! We’ve done up to Giant Steps but because of a heat-wave and Covid, did not want to chance the road mid-day.

    Where to stay

    Since the Moraine Lake Lodge is not dog-friendly you’ll have to stay off the lake for your visit! The nearby famous Fairmount Chateau Lake Louise is dog-friendly but extremely luxurious and expensive. I tend to camp at the Lake Louise campgrounds or stay at a hotel in nearby Canmore. The campgrounds are utilitarian but a great location, clean, and dog-friendly.

    Lake Louise campground
  • Amazing Adventure Camping at Floe Lake (Rockwall Trail) with Dogs

    Amazing Adventure Camping at Floe Lake (Rockwall Trail) with Dogs

    The Draw

    Just google Floe Lake and Rockwall trail and you’ll know why it’s one of the most popular trails and locations. In fact, that’s probably how you got to this blogpost. It’s accessible, and possible as a day hike or run. The entire 55km Rockwall trail can be done in 3-5 days but the highlight is definitely Floe Lake and Numa Pass. Usually most people hike from Paint Pots to Floe Lake and we wanted to do the same, but booking the trail because our biggest issue.

    The view from camp

    Dogs are allowed on Rockwall trail but must be on leash, and there is wildlife (more about that later) that you must be prepared for (even on leash!).

    Floe Lake in the morning with overhead clouds

    Booking

    The Rockwall trail is a classic of the Canadian Rockies and difficult to book campsites in! I waited in line online when the booking opened and was 7000s on cue. By the time I got to book, most everything was taken. Floe Lake campsites is one of the most popular backcountry sites in the Rockies so of course it was taken. I booked some random days in Tumbling creek campground and Numa creek campground and hoped for cancellations. You can hike into each campground from the road and I just really wanted to see Floe lake with the dogs.

    The weather was mixed, some rain and some sun!

    Eventually, we checked daily and were able to secure cancellations at Floe Lake during our vacation time. We booked every cancellation we could and joined up the dates (and cancelled the ones we were not going to use). Unfortunately the way the booking system works is that your reservation fee is separate than a booking fee and you do not get the booking fee back. In the end there’s no benefit to cancelling an unused reservation (you will not get your money back) other than to let someone else use the campsite. I strongly encourage everyone to cancel unused campsites though, because it’s so limited and for all the evenings we were at Floe, there were usually unused tent pads.

    One of our day treks took us to a quiet pass

    Our Plan

    Because we were not able to book campgrounds in order for the Rockwall trail, we just aimed to book whatever we could at Floe Lake and do day hikes from the campground. Since Numa Pass and Floe were the highlights of Rockwall, we figured we would explore Numa Pass and check out other areas we could hike to within a day. Everything would be limited to what the dogs could do (Bodhi gets heat stroke and isn’t the most agile of dogs) and what we felt like!

    Above Floe Lake looking onto Numa Pass

    The Hike In: Floe Lake Trailhead to Floe Lake

    The hike in is not technically difficult, and about 10.5km from the Floe lake Trailhead. Most of the trail is narrow with a slight incline across a forest that is bare from a recent forest fire. When we hiked in, the trail was very overgrown to the point your couldn’t see your own feet and made for difficult footing with a dog on leash in front and a huge pack with awkward balancing. The trail is mostly exposed so if you’re heading out in the summer with dogs that are sensitive to heat, head out as early as possible.

    Hiking into Floe from Floe Lake Trailhead

    At some point near the end of the trail (at 8km) the trail climbs up dramatically and then you’re at the lake. There is a couple water sources that may or may not be running in the summer but we had access to water before the climb. This was my first hike with a pack in the year so I really struggled in the heat! Erica was kind enough to wait for me in the bug-infested breaks I had to take. I also lost a water filter I had not secured well enough to the front of the pack. All and all, not my best hike, but we did get there eventually!

    A rest log on the way into Floe Lake

    Wildlife

    Normally most people are worried about the Grizzlies and Black bears but we found porcupines and squirrels to be the most dangerous. Squirrels and chipmunks are awful because they run across your path without warning and then your dog instantaneously jumps at them pulling you and your 40lb bag down. Porcupines were a bit of a surprise! We encountered one on the hike up to Floe (halfway up the incline, so about kilometer 9 going in). It was right off the trail hidden, so Bodhi almost got quilled, on leash, on the trail before Erica saw what it was.

    Numa Pass, the porcupine was between this spot and the lake

    The second porcupine was between Floe Lake heading up Numa Pass, about 1km in. We never actually saw it, but Bourbon somehow got quilled by stepping on a quill on the ground after the dogs seemed VERY interested in sniffing around the area. Needless to say, keep an eye out for the creatures!

    Camping at Floe Lake

    Camping with a view

    The tent pads at Floe are all over a wide area, and not organized in any way we could understand. The best site with a view over the lake is the first ones you see as you hike in from the Floe trailhead. We chose one further away from others with dogs and settled in just as it started raining.

    There were 4 tables at the food area and a couple beaches

    There is a wonderful eating area with bear lockers right by the lake that has the best views. We loved starting and ending our day there, watching the light move across the mountains and lake and were always able to find a place to sit at a table or on the beach. The first couple days there were still ice floes moving across the lake but eventually they melted by the time we left.

    We fit 2 humans and 3 dogs into a decade old 3 person tent

    We met a couple dogs each day we were at the campsite but were able to steer clear of them without issues. Every evening we moved our tent closer and closer to the “best” spot and the last evening we snagged a photo-worthy tentpad!

    Day treks and scrambles from Floe Lake

    Looking down on Numa Pass

    In the end we stayed at Floe for 4 days, 3 evenings leaving us 2 days to explore. The first day took us to Numa Pass, up to a couple viewpoints, and a look at Numa Mountain. From the viewpoint, we then spotted some lakes in the far distance so we aimed for those (no trails, just wandering). We scrambled over a boulder field and scree and as the weather changed we decided to stop, take some photos and head back.

    Going for a walk!

    I had seen some treks to Numa Peak before we hiked out but there was very limited information on if the peak was doable with dogs or not. The next day we decided to aim for Numa and head back if it ended up being too difficult. It’s always hard to know how tough something is until you actually try the scree and test the angle. We made it to just below the notch of the peak before we stopped for lunch and called it. It would have been sketchy to get Bodhi past the point with exposure and the views would not have been better. We were just meters from the peak and were further along than we had been expecting!

    Looking at Numa Peak
    Numa Peak, we made it just before the notch

    Numa Peak was such a highlight, but I would not recommend it for people and dogs that are not comfortable hiking and scrambling. You can walk right up to the scree and see for yourself but there is no rescue or rangers here so you must be self sufficient and be extra careful if your dog is not full capable and under control. I also recommend a harness made for lifting, and paw care if your dog’s paws are not weathered for scree.

    The best views

    Would I hike the Rockwall trail again?

    Oh yes!! This was such a lovely location, very peaceful for how popular it is. Definitely be aware that you are in the backcountry and take extra precautions but Floe Lake was such a highlight of my year. I’m so thankful I have a friend to do this with, one that understands my dog limitations and is willing to camp, hike, explore and scramble with me!

  • The Best Dog Boots for Snow

    The Best Dog Boots for Snow

    Dog Winter Boots Overview (highly detailed)

    One of the questions I get the most is what dog boots I recommend for the winter. The answer is complicated. It depends on the snow you’re on, the temperature, the length of time you are outside, how deep or packed the snow is, and what type of dog you have (dewclaws? energetic? insane? eats boots?). Here’s a highly detailed answer that seeks to lay everything out to help you choose a boot.

    Should Dogs Wear Boots in the Snow?

    I do not put boots on my dogs unless they need it. Dogs do not need boots in all conditions and I do not pre-emptively put boots on unless I know they will need them. Dogs need to feel the ground underneath their paws in order to navigate their surroundings and boots will make them slip as well as impede on things like climbing stairs, and walking up rocks. Imagine trying to open a can with thick gloves on your hands and not being able to see them as you work. In general, I advise not to put on boots unless your dog shows you they need them, but to carry them with you in case they do. However, there are obvious situations you should put on boots.

    1. They are injured or healing from injury
    2. They have a history needing boots in certain situation

    How do you know your dog needs boots? Mine will stop running, will lift up their paws, and will be obviously happier with the boots on zooming again once I put them on. Over time, I know that my dogs need them at -10 or lower, and I will bring them in my pack if I think we might reach those conditions (I tend to hike up mountains, so it gets colder as we ascend). Don’t forget the windchill!

    Bodhi is more sensitive to the cold than my Vizslas

    Dewclaws/ Small paws

    One of the biggest hurdles to booties are dewclaws or if your dog has small paws (in relation to ankles) and the boots slip off easily. Even though my girls do not have these issues, this is the advice I’ve seen works. Dewclaws rub on straps, edges of boots and over time they can bleed and make boots very painful. Some boots have straps in better locations (you need to try them) but even without a strap, the inward pressure on the dewclaw and material rubbing can be painful.

    If you notice this happening, use Vet Wrap (any brand will do, same used for humans) which is a self adhesive wrap under and then over the dewclaw. Do not wrap too tightly so it cuts off circulation or too loosely that it will move. It’s to prevent the dewclaw from moving too much. Then either put the boot over it, or use a sock on top.

    Socks are another layer of protection for dewclaws, or dogs with paws that are too slim so boots slip off. Either with or without the vet wrap, slide the boot on, and secure with vet wrap or medical tape. Then slip the boots on top. You will need to experiment to see what works best for each circumstance.

    Rubber Boots

    Balloon and rubber boots have their uses but not in the backcountry. Balloons actually work well and stay on well but will not survive long on abrasive surfaces like rock. They’re better on small dogs, short works, and when salt is a problem with leashed walks around the block. They’ve been used by my friends’ Chihuahuas and Pugs, dogs that need to be carried after a certain amount of time out. The wellies are thicker and some come lined, but some dogs will not do well with the thicker sole, and the boot will not stay on an off leash dog.

    Wonton is happy with his balloons to a point, then demands to be carried.

    Sock boots

    I do not recommend these boots for any long distance off leash running or walking. They’re best for indoors (if your dog is slipping on the floors), for smaller dogs, and those that are just going outside around the block for a potty. They will slip off with movement and are not ideal for snow.

    Classic Style

    I’m just going to call this type of boot the Classic style. They tend to have a soft material on the top, and a rubber sole on the bottom with a strap around the ankle. No matter what anyone says, they are not waterproof, but they’re ok with packed snow. The ankle strap can be very difficult with dewclaws and if you don’t use a sock, they can have a hard time staying on if your dog runs around off leash. A trick is to twist the boot both ways a little bit (clockwise and anticlockwse about a quarter twist) before tightening the strap.

    The Classic style will wear longer than rubber or sock boots. You definitely see your money with the construction of the boot. Cheaper styles will have stitching that rubs against the dog’s paw making blisters. We’ve experienced blisters on the top of the boot, and the sides where the sole meets, as well as the ankle. You also see the pricing difference with the quality of the Velcro.

    The downsides to this boot is many. No matter the brand we’ve tried, my dogs will take these off if we go for hours on a backcountry hike. The snow gathers around the opening and warms up with the temperature of the dog. The snow then turns to ice and starts rubbing at the ankles. My own dogs are hairless and the boots we have tried seem to have been made for dogs with thicker ankles so the boots don’t stay on as well. The versions with thicker soles have been the most disliked because with no feeling at the paw, they cannot scramble or climb obstacles. Last, with time our boots have worn down and the materials have peeled away.

    Overall, these have their uses and I’ve used them for years. I would recommend duct taping them closed, and to a jacket if it’s possible to keep them on. They’re better for dogs that aren’t running around like crazy and I would select boots with thinner soles and a warranty.

    Ruffwear Polar Trex -Thick soles with gaiters. Good idea but Whiskey didn’t like these. She couldn’t feel the ground and the gaiters took up and kept snow inside.

    Canine Equipment Ultimate Trail Boots -4 different boots, L/R back sized smaller than front. Discontinued, longer review here. I liked these boots for the thinner soles, easy to put on straps and warranty that my friends had tried. Unfortunately some of the older boots I had purchased had started wearing on the top and the material split disintegrating to pieces. I’m still using whatever is left however.

    Hurtta Dog boots – We used these until they broke. The fabric on the middle/center of the heel wore through and made holes. Whiskey didn’t mind these and they stayed on if you pulled the strap tightly and then wove it back through the strap in the front. Otherwise they would come off. A new version is supposed to be coming soon.

    Old pair of Hurtta boots. The weak point was the velcro and where the boot joined the sole

    Musher’s

    This type of boot is what we used on mushing dogs while dogsledding in the Yukon. They’re very cheap, easy to put on and off, and are thin so the dogs can feel the ground. You won’t be too frustrated if you loose a couple of these but they won’t last as the fabric does wear out. These boots are good for packed snow on trails, nothing wet (or they will freeze), when you just want to keep the ice out. They’re also a very easy beginner boot if your dog is fussy about the thick soled ones with thick straps. I’ve been using these more with Bourbon because I can’t trust she won’t lose them but so far, I’ve been able to find the ones she’s “lost”.

    I’ve been really liking the Nonstop booties these days. The price is reasonable and they use a higher quality velcro with a bungee that makes putting the boots on easier and tighter. The boots however do let in snow over time with deep powder and then they fill up with snow and fall off. This is normally after several hours running around. The edges also do ice over like the other boots we’ve tried, and you cannot get the boot wet or it will freeze (no running through creeks).

    I’ve used the nonstop Protector Bootie as an injury bootie and I love it but it’s also not good with cold weather as it will freeze as well. It’s more protective in damper and warm conditions but I wouldn’t recommend it in the snow. With all these boots, if you can, duct tape them on!

    after 2.5 hours in the snow, you can see the ice building

    Soft Boots

    There are all higher up the leg than some of the short Classic boots. This can be better or worse for dogs with dewclaws depending on the location of the straps. It’s better for trails where the dogs need just a bit more length so snow doesn’t fill in, but can be worse if the snow does fill in and collects to make ice balls. Like all the other styles, the quality (and usually price point) does make a difference for sewing and materials used.

    The downsides to these boots are they slip down my dogs’ legs. The velcro is never going to hold through all the movement and I haven’t found one with higher quality velcro and many straps. The seams are an edge around the sides of the paw and also rub the paws over time. The snow collects around the rim and will fill into the boot and then freeze when the dog’s body warms the snow into ice. Duct tape can solve most of these issues!

    Muttluks– I like Muttluks as an emergency bootie but the straps aren’t great so I duct tape them to Bourbon’s paws. They’re also all the same size so looser fit in general.

    Voyager K9 Apparel– the highest boot and better for shorter walks, not major hiking because the fabric is not waterproof.

    Neoprene Options

    Great because snow does not stick to Neoprene and even when wet, Neoprene will hold in heat (it’s what wetsuits are made out of to keep people warm in the water). Not great because it’s very thick material and if your dog needs the feel the ground or any kind of technical surface they will probably not like it (Whiskey struggled). With dogs that do not mind a thick sole, these might be a good option.

    Neopaws – a huge variety of sizes and orthopedic options, but very thick sole

    GF Pet Elasto-fit Boots

    Gaiters

    For snow that’s a bit higher but NOT very deep snow. Gaiters will fill with deep snow if there isn’t a seal on the boots and snow will just fill in and collect with no way out (we’ve experienced this and took them off in deep snow). Otherwise it’s great because you can’t lose the boots. They’re complicated to put on, but I used them on both dogs without issues or complaints. Backcountry Paws seems to be constantly out of stock, but I would recommend them if they were possible to order. Contrary to what you might think, I would recommend them for more packed trails so snow won’t get in, or for dogs that won’t go swimming in deep snow.

    Backcountry Paws Gaiters

    Walkee Paws Leggings

    Wax

    If your dog is gathering snowballs or is picking ice off his paws, Wax is a great solution that does not involve losing boots. Trim the hair as much as you can around and under their paws, and apply Musher’s wax (in the car right before you head out). It’s easier to apply the wax when it’s not frozen, and you do not want to get wax on your car, or let your dog lick it off on the ride so just before you run is best. I apply it to my dogs just as a protective layer if I think we are close to their comfortable exposure temperature -5 to -10 in order to increase their ability to run without boots. My girls don’t ball up or collect ice with their silky hair but the wax does help protect their paws slightly.

    paw Pup Wax – use after out for a long time or exposure to salt

    Musher’s wax -works if your dog isn’t cold but gets ice balls around the long hairs between their paws (first would be to cut them shorter). They also do protect for a couple degrees difference (say if your dog needs boots at -5 degrees this might help make a 4 degree difference) and against salt but it does wear off. It it on right before you get out of the car when it’s slightly warmer as I’ve had a harder time when the wax is frozen.

  • RELIABLE RECALL CHALLENGE: Can your dog do this?

    Here’s a list of recall challenges from easy to hard. If you’re struggling with what to do next in your recall training, this might give you an idea about how to move forwards. Actively seek challenges after your dog has a reliable recall when it is safe! Make sure you reward reward reward, and never yell or punish your dog when they come to you (even if it’s taking a VERY long time). There’s a load of resources online about how to reward your pup for recall so make sure you’ve got a basic recall before you can challenge.

    Can you recall your dog from…

    1. A dog approaching on leash
    2. Approaching something tasty on the ground (that they would normally eat)
    3. A dog approaching and staring straight at your dog
    4. A human approaching offering treats
    5. Birds/Squirrels at a distance (after your dog sees it)
    6. An offleash dog approaching slowly
    7. An offleash dog approaching quickly and staring at your dog
    8. While your dog is eating something tasty on the ground (after your dog has taken a lick)
    9. A human your dog knows and likes
    10. A dog your dog knows and likes
    11. Larger prey animal like Deer, Racoon, Cats, Porcupine
    12. Predators like Bears, Coyotes
    13. A human dressed in black, during dusk/dawn
    14. A human stalking dressed in black, during dusk/dawn, on your property
    15. A strange dog on your property
    16. Someone feeding your dog treats

  • Vizsla’s first Heat- What to Know, How to keep Camping

    Vizsla’s first Heat- What to Know, How to keep Camping

    It’s becoming more common in North America not to spay or neuter a dog until they’re “fully developed” as it’s finally being recognized that the previous recommendations to spay at 6-8 months, before a dog goes through a heat cycle, is not generally healthy. Rescues tend to spay even earlier, some as early as 8 weeks! Reasoning is that early spaying prevents unplanned mating and litters and the unwanted dogs that end up killed in shelters. While this is still an issue in some locations, it’s also quite easy to prevent unwanted pregnancy in a pet dog so I wrote this to help out owners that may be nervous about managing a dog in heat.

    Some rescues spay a puppy this young

    So why wait?

    Waiting until the dog reaches puberty is now generally recommended so the dogs can naturally develop with hormones from their sex organs. This is proven to reduce cancers, orthopedic issues, behavior issues, urinary incontinence, however increases the chance of mammary tumors and cancers, as well as testicular cancer (just the same as removing the breasts will remove the chance of breast cancer). A study with Vizslas in particular show that neutered dogs (between 6 and 12 months) had significant higher chances of mast cell cancer, lymphoma, all other cancers, fear of storms, and those before 6 months had increased chances of a behavioral disorder.

    Life continues with a diaper

    I chose to wait with Whiskey and paid for an OSS spay (more about that here) that keeps an ovary so she still has her heat without bleeding. Whiskey went through several heats before her surgery. With Bourbon, the advice from my vet now is not to undergo an unnecessary surgery if possible so we will wait until there is a reason to.

    Owning an intact dog is definitely more hassle and work. Not only do you need to keep a close eye on a female in heat, but you need to deal with bleeding, a potential change in personality, and it can be extra challenging around other dogs. At first I was quite overwhelmed with the process, but after a heat I didn’t find it difficult to deal with.

    Bourbon hiking and adventuring during her first heat

    A Vizsla’s heat cycle

    A female Vizsla’s first heat can be anywhere from 8 months to 1.5 years old but typically 10 months to 1 year (this changes in breeds, typically depending on weight/size). After the first heat, their heat cycle is usually between every 6 months to a year. Whiskey had her first heat just after she turned 1 year old, and Bourbon just before her birthday. I believe Bourbon was first out of her sisters. Bourbon’s heat cycle is every 6 months, just like her mother, and Whiskey is once a year. It takes a couple years for their cycles to regulate so be patient. The first heat is NOT usually typical of the rest of them. Ask your breeder about your dog’s mother’s heat and you might get a hint of what may happen!

    Signs before

    With Whiskey I had lots of signs before her first heat (about 2-3 weeks notice), with Bourbon there was none and it’s always been a surprise. Whiskey is more in tuned with her emotions and body, while Bourbon is a little bit of a jackrabbit with a small attention span and is harder to read.

    Whiskey’s signs at the beginning of her heat (before bleeding)

    • Less appetite, skipping meals
    • More socializing, interest in saying hi to dogs (both female and male)
    • Dogs are more interested in sniffing
    • Swelling of vulva
    • licking her genitals
    • marking (pee marking everywhere)
    • discharge

    Bourbon’s signs

    • Nothing, then SURPRISE

    Other signs your dogs might have

    • Change in behavior (clingy, sleepy, personality change)
    • Aggression to male dogs

    Changes during a dog’s heat

    I never noticed a behavioral change in either of my girls although it’s been regularly reported that Vizslas in particular will get VERY extra Velcro and needy. They can be uncomfortable, moody, basically just like human females and need extra emotional support. The big difference I’ve noticed is that my girls are very social especially with good looking males! Whiskey is a gigantic flirt, however it’s not with every male. She is particular with her ‘type’ and will be very upset at unwanted advances from the ‘wrong’ dog.

    Whiskey will ask to go outside to mark and look for males during her heat, and will wander further and approach dogs (she normally never approaches dogs) and show them her rear. It’s very common for dogs to be more tired and uncomfortable but I haven’t noticed that with either of my girls. We continue our regular hikes and walks (just further away from others) and I do not notice a change in energy although it’s very common.

    Dog diapers

    Bleeding and diapers

    Bleeding is possibly the largest annoyance you’ll have to deal with, unless you own a male unfixed dog. Depending on your living conditions, you could just lay out blankets in a crate or bed and change those frequently. Vizslas keep themselves very clean and you might be surprised how little you have to clean! I’ve also heard it can be more comfortable to air out and not wear a diaper all day long if it’s not needed.

    On the other hand, diapers are very handy if you do not have a large uncarpeted area for your dog, or you are sleeping together in a car or tent (camping is extra awkward!). My girls will bleed for about 3 weeks, the last week turning less bloody and more clear. This last week when the blood stops, is actually the most fertile point and you need to be extra cautious of meeting males. You’ll also notice your girl ‘flagging’ with her tail to the side when she meets other dogs (or smells them). Keep your dog supervised the entire heat, but keep an even more close watch (and tighter leash) during the stage when they flag because this is when they may escape and when they are most fertile.

    The pink is Seasonals Diaper, the other is Amazon brand Teamoy lined diapers both Medium

    We’ve tried 3 types of diapers. The first were home-made, just an old pair of panties tied tight with a hole for her tail and a panty liner. This…was a bit of a mess and Whiskey could escape from them easily. The second was a store-bought one and I put liners in (brand was Seasonals), and the third, my favorite is a washable one with built in liners (see photos).

    Because our dogs have such a skinny stomach and slim buttocks, you may need to size down if the diapers go by weight of dog. I ended up sewing extra velcro onto the diapers because Whiskey was so skinny. The important thing to remember is to take the diapers off before they go outside otherwise they’ll pee in it. This isn’t too hard to remember but can be quite the game when you’re camping and your dog jumps in and out of the tent all night long.

    Camping with your dog in heat

    Because we camp in an area with bears, cougars, and coyotes, blood needs to be contained and sealed off. I take freezer ziplock bags to put used liners in, and then put the ziplock bags into drybags and everything is stored with our food and garbage overnight (100m+ away hung on a tree or in a buried bear bag). I will also bring dog wipes to deal with cleaning, extra water, and lots of panty liners. Even if the diapers have built in liners, it’s more efficient to bring liners than 4 pairs of diapers if you need to carry in and out. Bourbon sleeps inside my sleeping bag the diaper needs to fit very well! I’ve done 3 camping trips with Bourbon in heat, in 3 different tents without issue.

    Males and interactions with dogs

    During the heat, both females and males will be very interested in sniffing my dogs. I normally walk in quieter locations but during heat, will flat out avoid certain places that may have more dogs. I will always ask (if I cannot see) if a dog is female or male, fixed or intact before they meet. Whiskey can be very aggressive in flirting with a dog so if the dog is small, or shy, or finds her advances unwanted, we stay away and are leashed.

    Whiskey will flirt with all dogs, female or male, and even old seniors so I really need to control her around others! Bourbon’s still very new and is not spayed (Whiskey has her OSS spay) so I do not entirely know her personality during her heat around other dogs. Her first heat she showed no interest in males she met (very few, none intact) but her second heat she was singing to the boys (she stayed at her breeder with intact males). No matter what, keep your dog under control and supervise them even in a fenced yard (dogs can mate between fences).

    Bourbon in heat hanging out with her sister River

    The easiest thing if you have an unfixed male living with you, is to see if someone can take your male for a couple weeks. If not, separate them in different rooms or crate one at a time. If there are several males in a household, they can lose their appetite and fight amongst each other so you might need to separate the males from each other too. It goes to say, do not let your female in the yard unattended, do not let your males out together unattended.

    My experience with my girls in heat

    When I lived in the city, I would drive 45mins away for off leash walks on extremely quiet trails and wake up earlier for city walks. I don’t mind letting Whiskey say hi to other dogs on leash that are fixed, but under no circumstances do we allow humping (from any dog, regardless of sex or neutering). Even though Whiskey is spayed, she can still tie and that can be traumatic and physically painful for her. We once stayed at an Airbnb cabin out of town while Whiskey was in heat and literally had the “boys” come to the yard and wait for her to come out.

    Overall it’s not been too much work outside of managing diapers as the dogs run in and out of the house, car, tent, etc. Most of my friends have fixed males that do not have any interest in my girls in heat, and we do not meet too many dogs on a daily basis. I work from home now and no longer need daycare or a dog walker that insists on a spayed female (this can depend on cities and what is the norm). Some of my friends have Vizslas that have a hard time and are quite depressed or mopey but my girls seem unfazed so far (Bourbon hasn’t had enough heats for me to be sure). Whiskey has great recall even in heat, is spayed, so she’s off leash in most cases, but Bourbon has a very long range so she needs special care, more on-leash time, and remote walks.


  • What you need in a Hiking Dog’s First Aid Kit

    What you need in a Hiking Dog’s First Aid Kit

    Already have a human first aid kit for hiking and camping? Wondering what ELSE you might need for your dog? There’s no need to double up commercial first-aid kits for you and your pup as most elements can be shared but there are some extras to bring and take into consideration. The dog-specific pieces can also be shared with humans and you might find them quite useful!

    Listed in detail below, some items that are good to have at home, in the car, on the trail

    Whiskey and I have been hiking since she was a puppy and with the addition of Bourbon, we’ve had to deal with lots of minor issues while in the backcountry and on roadtrips without reception or vets nearby. Even at home, we’re able to deal with minor emergencies without having to pay for a vet visit.

    When I’m hiking I always have a small first-aid kit and I add extra pieces depending on the length of the hike and the risk factors as well as the size of the pack I’ll be taking. I’ve never seen most of these products listed in ready-made canine first-aid kits that you can purchase so I thought this list might be good for people that are active and in the wilderness with their dogs.

    Consider where you are going, the environment and temperature, as well as any medical issues your own dog might have. Always bring extra clothing for warmth, and shade. And let me know in comments on anything I may have missed!

    Trail Dog First Aid Checklist

    Items in your Human First-Aid Kit should have that can be shared with your Pet

    • Gauze
    • Adhesive tape
    • Swabs
    • Ice Pack
    • Scissors/ knife
    • Gloves
    • Bandages
    • Alcohol wipes
    • Saline
    • Tweezers
    • Headlamp/flashlight
    • Splint
    • Eye wash- non medicated eyewash can be used on dogs
    • Polysporin/ antibiotic ointment
    • All-purpose skin soother -Skincare for sunburns, rashes, chapped lips, bug bites, and healing cuts and scrapes
    • water-proof bag
    • towel
    This is minimum what I carry in my daypack
    This all fits into a small bag in previous photo called “first aid kit”

    Trail Specific First Aid Kit Items

    • Blister Packs
    • Zip Ties
    • Lighter
    • Water Purification Tablets
    • Emergency Blanket
    • Electrolyes
    • Multi-use tool/ Swiss Army Knife

    Trail Dog First Aid Kit additions

    • Benedryl (Diphenhydramine), Reactine (Cetirizine)– Pills are the most used item in my first-aid (human or dog). These I use for any allergic reaction including bug bites
    • Tick remover– if you have a chance of ticks in the area, clearly also for humans
    • Tweezers– very useful with the tick remover but also splinters, cactus spines, shards of things that get imbeded
    • Pup Wax -nose and paw wax balm for dogs, I use this nightly when hiking on boulder fields and the paws are about to be cracked (or are already cracked) to keep them moisturized as well as dry noses
    • Dr Dobias Skin Spray– Wonderful for skin scrapes and closed wounds as well as insect bites. Also great on humans
    • EMT Gel– Fantastic for paw cracks and tears in the skin. I was able to stave off Bourbon’s paw fully cracking with this gel, pupwax, wrapping and a bootie while hiking for 8 days in a row.
    • Duct Tape– as much as the adhesive tape in a regular first-aid kit might help humans, I’ve found Duct Tape is very helpful for dog patients. It’s also wonderful for fixing gear that breaks and holding boots in place for crazy running Vizslas.
    • Superglue– or stapler but superglue is much smaller to carry on treks out (many of my friends will carry a stapler to staple wounds)
    • Dog-friendly bug/tick spray– I’m still working on finding the magical dog-friendly bug spray but I’ve used Cedarwood-based, citronella based, and I would like to try PERMETHRIN next. Regardless, throw a pet-friendly spray in
    • Emergency Bootie– slightly larger size than usual, universal boot (not left/right) to accommodate bandages underneath if needed. I use muttlucks and duct tape this one when needed.
    • Hydrogen Peroxide– to in duce vomiting immediately after ingesting a non-corrosive poison (do not induce vomiting if you think it might be corrosive), commonly while hiking, if your dog eats mushrooms, or human feces that may be laced with drugs, anything that may have drugs (including edibles), poisoned meat, etc
    • Activated Charcoal+ powdered milk– if your dog has eaten something and is reacting (you did not induce vomiting in time) already reacting to the effects. I add the milk to make it more palatable and it also coats the stomach to prevent absorption while the charcoal works to bind the poison. Mix with water into a paste with a syringe pump or bowl if your dog will eat it.
    • Vet Wrap– Extremely useful for paw injuries, holding bandages in place, or sprains. I use it for myself when I consistently sprain my ankle. Sticks to itself and is non-adhesive to anything else. Also useful for boots and harnesses that rub.
    • Gravol/Famotidine– Whiskey has a sensitive stomach so this is more Whiskey-specific. When her stomach is very gurgling and she’s not wanting to eat, I give her Famotidine and it settles. Whatever drugs your dog may need, of course, bring some in your first aid kit
    • Emergency leash/ Rope + carabiner– leashes and collars break or get lost, an extra rope can really help, be made into a quick harness, or help muzzle a dog in pain.
    • Dog sling/bag/ability to carry out an injured pet– depending on the size of your dog, whom with, and where you are going, make sure you have the ability to carry your dog out
    • Bandana or cloth– you may need to drench a piece of cloth in water to cool a dog down, and emergency it can be very helpful to cover your dog’s eyes, or muzzle your dog while working on an injury, especially if you are alone

    DO NOT SHARE

    Be cautious of these items and research ahead of time if the ones in your kit are dog-friendly or not

    medications– some medications can be shared with your dog, and some not. Make sure you have an understanding of the dosage and which are poisonous, this includes medicated eyedrops
    creams/oils– some ingredients that can be used for humans like certain essential oils can be dangerous for dogs
    bug spray– DEET is poisonous to dogs, even while spraying, make sure your dog is upwind
    sun screen– Many types of sunscreen are potentially toxic if if a dog licks it off

    Keep your puppies safe!

    [wps_products product_id=”7342189740231″]

  • the Best Tents and Considerations for Camping with Dogs

    the Best Tents and Considerations for Camping with Dogs

    Camping with dogs can mean freedom and an escape from the city, but it can also have it’s own complications, especially if it’s your first time or you camp solo. A good tent can really ease the transition and prevent accidents that might happen. There is a large variety of tents prices to go with those and since this your “home” while outdoors, it really is worth choosing wisely.

    Prepare

    So you want to go camping but your dog’s never been in a tent? After you purchase one, it’s a good idea to set it up at home, or in the backyard and take a nap together inside. Work on going in and out with treats and teach your pup it’s a good place. Check out this other post I wrote about first time camping with a dog and things to think about, as well as how to introduce the tent. Just please do not zip your dog inside the tent alone unless your dog is very chill, trained, and calm.

    Whiskey with my 1ppl Big Agnes UL fishhook- there are no zippers

    A Large Doorway

    When choosing a tent, look for a larger doorway. Doorways that are small and narrow will be difficult to get in and out when you are stepping over a sleeping pup, and can be frustrating at night. You want a good zipper that doesn’t snag, and ideally several options to open it quickly from inside and out. It’s great to have space to put a towel on the ground to clean paws before they jump onto your sleeping bag, and also space to put shoes, a bag, easy access to leashes. Finally you want to have a wide sightline outside for your dog, approaching animals, and anything else. The more animals you have, the more you will appreciate a wide entryway.

    I’ve now upgraded to a larger 2ppl Nemo Dragonfly tent with 2 dogs

    Mesh

    I cannot stress to you how much a good quality mesh is important with dog nails. UL or Ultra lightweight tents sacrifice tough materials including mesh for weight so it’s easier to carry but this lightweight mesh is very easy to puncture. Whiskey likes to “paw” at the doorway to enter and my heavier tents have withstood this. There are many snags in the mesh, but no holes but I’ve heard so many dogs ruining the popular UL Hubba Hubba mesh trying to jump out at the wrong moment.

    This Marmot Ajax 3ppl tent is well over a decade old and still going

    Freestanding

    Some tents, especially lightweight tents can be non-freestanding where you need to stake lines in order to create the tent shape. They prioritize weight over convivence and can also use trekking poles as tent poles. I don’t recommend these for dogs for several reasons. The more lines you have running from the tent, the more entanglement you’ll get with legs and leashes. Bourbon seems to have fun pulling out pegs on my last trip and the inside of my tent tends to wander with two dogs so a strong, freestanding tent is my goal. If your tent structure goes down every time a stake gets pulled, it could get frustrating! These tents also take longer to set up and especially with multiple dogs, rain, and wildlife, you just might want to have less complications in life! Lastly, I camp in rocky locations and places where pegging isn’t really an option, so a freestanding tent is a must.

    Group 8 day backpacking trip

    Pockets

    I LOVE pockets! Pockets in tents are amazing. There’s always collars, leashes, sprays, towels, and a multitude of things that need to be packed away in it’s own place. I always put my headlamp, dog collars, and first aid things right next to my head. Pockets are also great for drying out whatever the dogs get muddy, and keeping the tent floor from becoming a huge mess when they start digging into your sleeping bag.

    My cheaper, heavier tent withstood the snow and wind better than the UL tents my friends had

    Footprint/Flooring

    Buy it, use it! Spend the extra cash for a footprint and use it, or a tarp is just as good. A thicker tent may not need a footprint (I don’t always use one myself when it’s dry) but lighter tents will need one and it will keep your tent lasting longer and dryer and prevent abrasions from rocks and dog paws digging.

    I suggest a footprint with snow or wet ground

    Single/Double wall

    Some lighter tents or cheaper tents may be single-walled. They tend to be solid so water does not go through but if pressed, water will condense through. These will not be as ventilated as double walled tents that will have mesh as an inner layer with a waterproof fly. I highly suggest double walled tents. Many dogs will like to lay in a corner of the tent pushing against the tent walls and if it’s a single layer, can bring water in. The single layer laminated wall is also the only layer between you and the elements so if it rips, you will need to pray you have enough duct tape! When the weather gets too warm or stuffy, it’s also nice to be able to take off the rainfly and let the tent air out or even enjoy the stars! But if your dog isn’t feeling safe open to the elements (many dogs feel uneasy) you can put the fly back on and create a closed off den.

    This is a cheaper Coleman 6ppl tent we car-camped out of for a month and half

    Car Camping

    With weight not a problem, I would suggest a large tent you can stand inside (check the height) and a second-hand or affordable one. You don’t need lightweight, and most tents these days are made well enough to withstand wind, rain, and typical use. The ability to stand-in and change or wrangle dogs without kneeling is SO helpful. Unless you’re camping more than 30 days a year, most cheaper tents will work just fine. We forgot our tent on our trip to Alaska and bought a cheap Coleman tent at Canadian Tire that lasted the entire trip fine under all weather and even crazy winds. With cheap tents, expect to replace pegs and take a little bit extra time to put together. The poles may have cheaper elastic but that’s also easily fixed with duct tape. Our North Face tent was much better made and still survives to this day, but it’s heavier (better fabric), packs easier, and has better zippers. If this is your first time out camping, put your money elsewhere (like a good mat!).

    This is my 4ppl Northface tent for car-camping that you can stand up in

    Backcountry Camping

    This is where weight and packability matters. For most brands, there are UL tents of various sorts and a cheaper line of tents. Even though the UL tents tend to be more expensive, I do not suggest them because the material is easier to break and do not stand up to dog use well. Unless you have one well trained dog and weight is of utmost importance, I would suggest a heavier, cheaper tent and take on the extra 2lbs it may weigh. Either way, bring some duct tape on your trip in case something rips open and a big scoop of good humor! Camping with dogs is always interesting!

    A double walled tent allows you to take off the fly and enjoy the stars and breeze

    We’ve used the Marmot Ajax 3ppl tent for 2 of us and Whiskey for well over a decade. I’ve got a UL 1ppl tent for solo camping that’s only 2 lbs (it’s the Fishook tent with no zipper) but that would be too tight with 2 dogs, camera gear, and clothing. I still carry the 3ppl 6lb tent when just solo camping with Whiskey sometimes because it’s just so much more comfortable if the conditions are rainy. Being stuck in a 1ppl tent for a rainy evening or afternoon is SO uncomfortable and I would rather carry weight than be stuck in an awkward tight position. Researching further I just ordered the Nemo 2ppl tent as my new solo tent and I’ve been considering the Copper Spur 3ppl tent as a new 3ppl option but am holding back due to the flimsy material and huge cost. I think if I’m sharing a tent, then sharing the load would be acceptable.

    My heavier Marmot swallow 3ppl tent for winter camping

    Winter Camping

    I haven’t done too much backcountry snow camping but I did buy a heavier vintage tent for the purpose. It’s very warm, with loads of venting options, space, and can seal up tight if needed. Winter tents that are light are very expensive, so vintage was the way to go! Even though it’s not the latest tech, the huge zippers, heavy mesh make me so comfortable with dogs running in and out. The last time I used the tent it was actually too warm in the morning, and I haven’t found too many friends that want to winter camp so I just haven’t had the opportunity to use this one too often.

    FAQ

    What’s the best backcountry tent for 1 person and a dog?

    I would suggest a stand-alone, double walled, cross-bar 1 or 2 person tent to share with a dog. Crossbar tents are quick and easy to set up with a large door and slightly thicker mesh (not super UL). Make sure the zipper is well made and does not snag.

    What’s the best car camping tent for dogs?

    If you are starting out, get something that is easy for one person to set up (unless you always camp with multiple people)

    How do I teach dogs to camp in a tent?

    Check out this blog about first time camping with dogs!

    What other gear is good for camping with dogs?

    Here’s a blogpost on Our Best and Tested Gear for Camping with Dogs